
What is a Shooting Star candlestick pattern?
The Shooting Star candlestick pattern is a bearish reversal signal that forms after an upward price move. It is characterized by a small real body near the bottom of the candle and a long upper shadow.
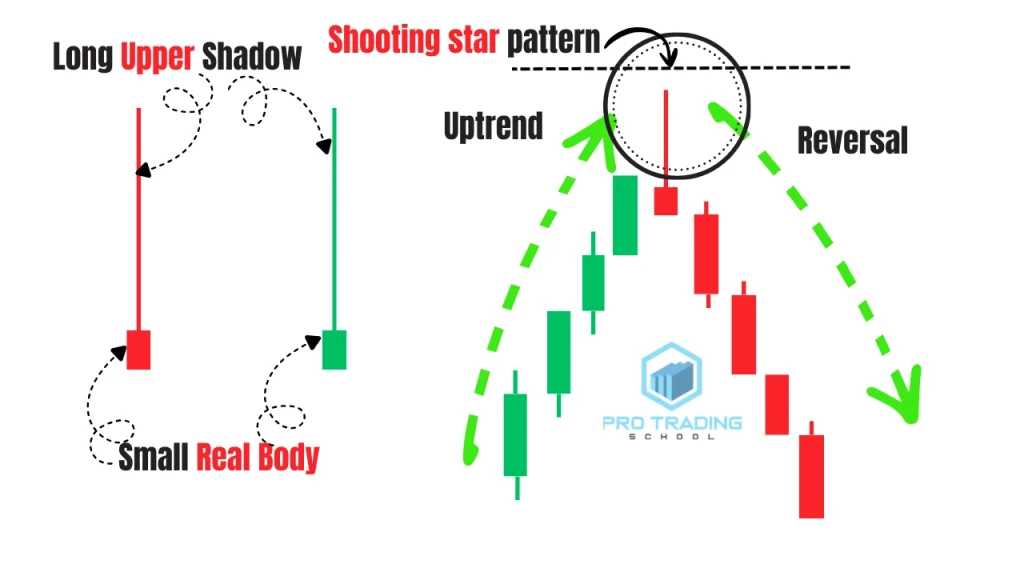
This structure shows that buyers initially pushed the price higher, but strong selling pressure forced the market to close near its opening level. The rejection of higher prices often signals that bullish momentum is weakening and a potential reversal may follow.
Key Takeaways
- The Shooting Star is a bearish reversal candlestick pattern.
- It usually appears after an uptrend.
- The candle has a long upper wick and a small real body.
- It shows rejection of higher prices.
- Traders often wait for confirmation before entering a trade.
Table of Contents
How to Identify the Shooting Star Candlestick Pattern
The Shooting Star candlestick pattern has a very distinctive structure that makes it relatively easy to recognize on a price chart.
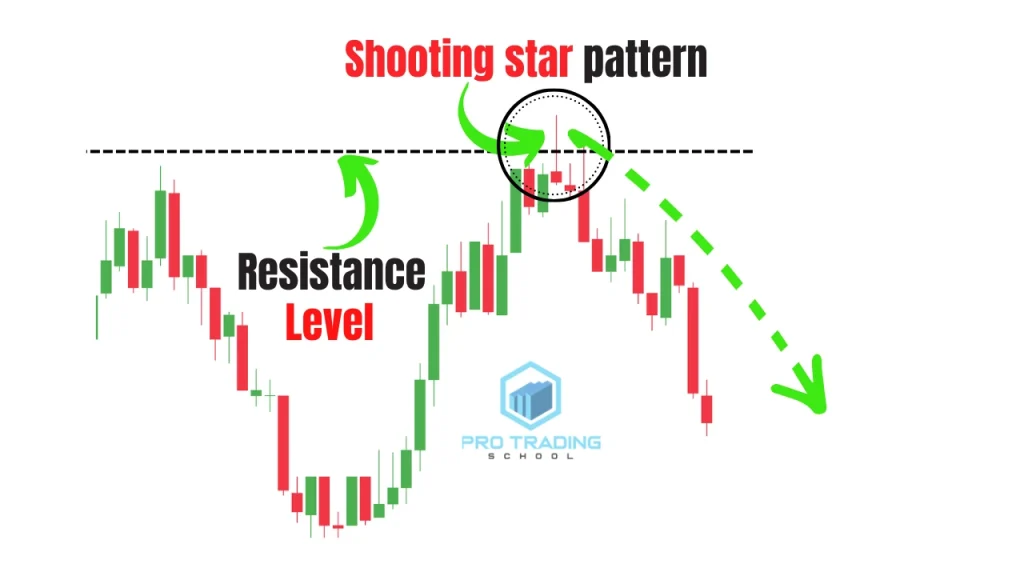
It usually appears after a bullish price movement when the market attempts to continue higher but fails to maintain the upward momentum.
During the formation of the candle, buyers initially push the price upward. However, selling pressure quickly enters the market and forces the price back down before the candle closes.
This creates the characteristic shape of the Shooting Star and signals that the upward momentum may be weakening.
To properly identify a Shooting Star candlestick pattern, traders should focus on several key characteristics.
1. A Long Upper Shadow
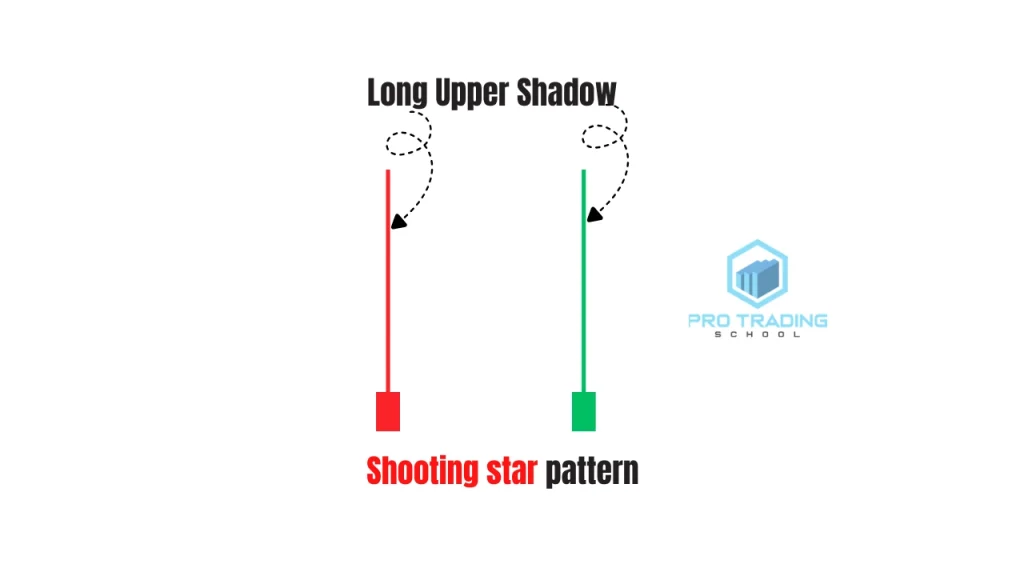
The most recognizable feature of a Shooting Star candle is its long upper wick.
This upper shadow shows that buyers managed to drive the price significantly higher during the trading session. However, they were unable to hold those gains, and sellers pushed the price back down before the candle closed.
In other words, the long wick reflects rejection of higher prices, which can indicate that selling pressure is starting to increase.
2. A Small Real Body
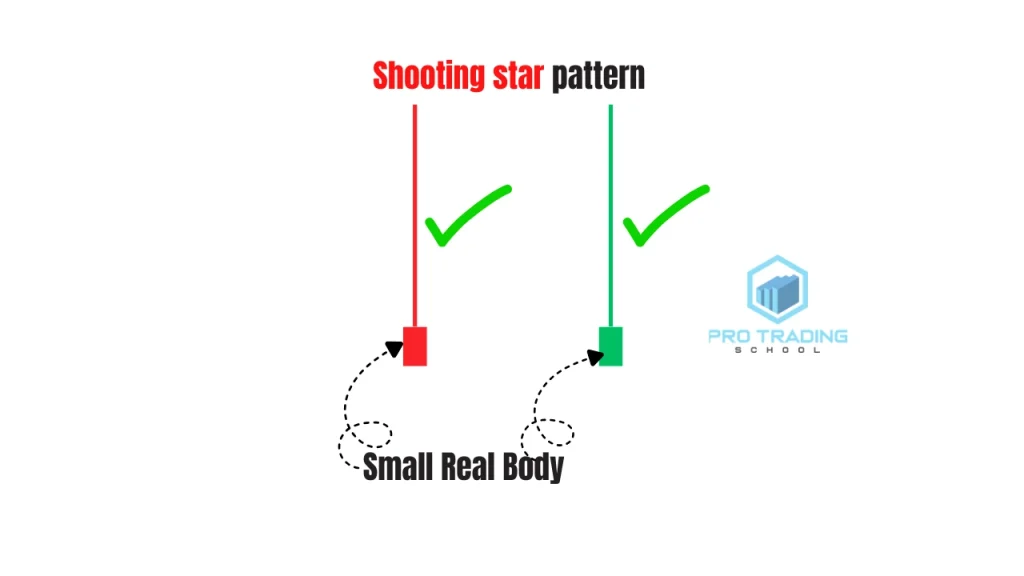
Another important element of the Shooting Star is the small real body.
The real body represents the difference between the opening and closing prices of the candle. In a Shooting Star, this body is relatively small and located near the lower part of the candle.
This formation tells us that although the market moved strongly upward at some point during the session, it ultimately closed close to where it opened. The small body highlights the loss of control by buyers.
The color of the candle is not critical. A Shooting Star can appear as either a bullish or bearish candle. What matters most is the long upper wick and the rejection it represents.
3. Little or No Lower Shadow
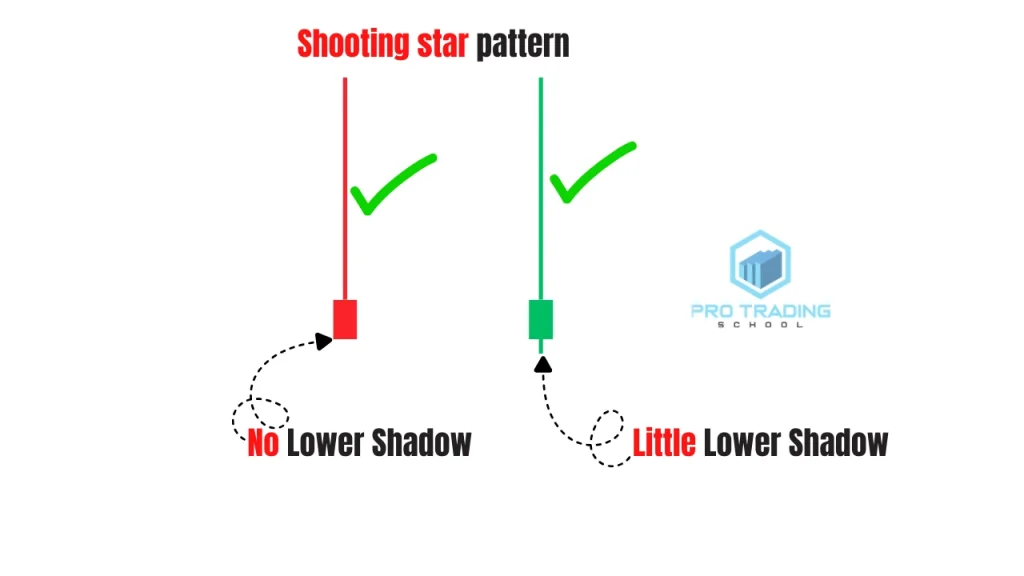
In most cases, a Shooting Star candle has very little or no lower wick.
This means that the price did not move significantly below the opening level during the session. The primary price action occurred above the candle body, where the upward move was rejected.
This structure reinforces the idea that the market attempted to continue higher but failed to sustain the move.
4. Formation After an Uptrend
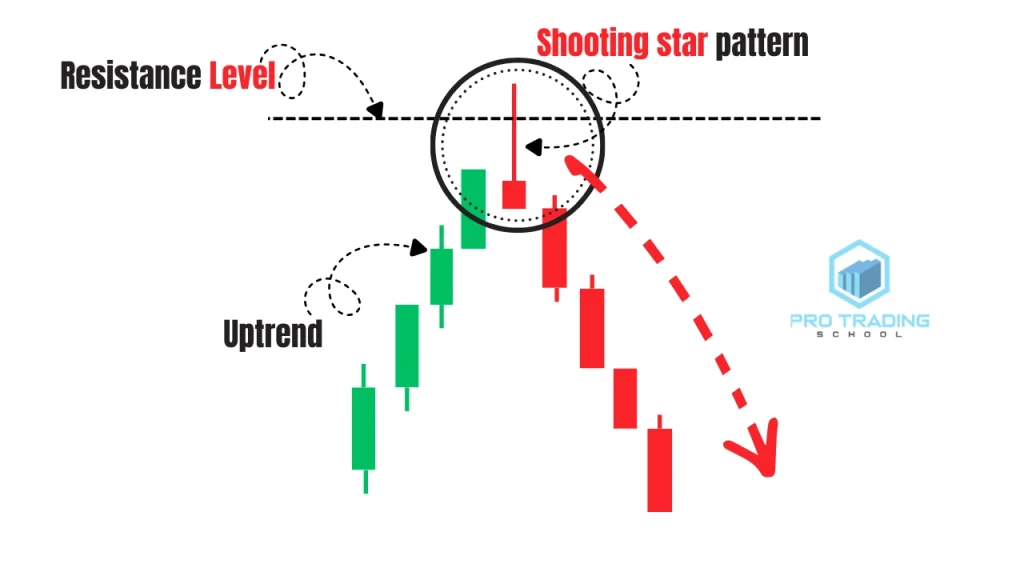
For the pattern to be meaningful, it must appear after a clear upward price movement.
When the Shooting Star forms at the end of an uptrend, it may signal that buying pressure is starting to weaken. Traders often pay close attention to this pattern when it develops near important technical areas such as:
- Resistance levels
- Previous highs
- Supply zones
- Trendline resistance
At these locations, the rejection of higher prices can indicate that sellers are beginning to enter the market.
5. The Pattern Signals a Warning

The Shooting Star should be viewed primarily as a warning signal rather than an immediate trading trigger.
Although it can indicate a possible reversal, professional traders usually wait for additional confirmation before entering a trade. Confirmation may come from:
- A bearish candle following the Shooting Star
- A break of a key support level
- A trendline breakout
- A shift in market structure
When the pattern appears at a strong resistance level and is supported by confirmation signals, it can become a powerful clue that the market may soon reverse direction.
How to Trade the Shooting Star Candlestick Pattern
The Shooting Star candlestick pattern can provide valuable clues about potential market reversals. However, the pattern should not be traded blindly. Its effectiveness depends largely on market context, trend direction, and confirmation from price action.
Professional traders focus on where the pattern forms rather than simply reacting to the candle itself. When the Shooting Star appears in the right market conditions, it can signal that sellers are gaining control of the market.
Below are some of the most reliable ways to trade this pattern.
Trading the Shooting Star Pattern With the Trend
One of the most reliable ways to trade the Shooting Star pattern is in the direction of the dominant trend.
Before taking any trade, it is essential to determine whether the market is trending upward or downward.
Understanding a Downtrend

A downtrend occurs when the market consistently forms:
- Lower highs
- Lower lows
This structure shows that sellers remain in control of the market. Each rally is weaker than the previous one, and price continues moving lower over time.
In trending markets, price typically moves in two phases:

The Impulsive Move
The impulsive move is the strong movement in the direction of the trend. In a downtrend, this is the sharp move downward driven by strong selling pressure.
These moves usually happen quickly and reflect strong momentum from sellers.
The Retracement Move
After an impulsive move, the market often pauses and begins to retrace part of the previous move. This temporary pullback occurs as traders take profits or as buyers attempt to push the market higher.
However, in a strong downtrend, these retracements are usually short-lived before sellers return to the market.
The Ideal Shooting Star Setup in a Downtrend

The most reliable Shooting Star pattern often forms during a pullback within a downtrend.
In many cases, the retracement pushes price back toward a previous support level that has turned into resistance.
When price reaches this area, sellers may re-enter the market. If a Shooting Star candlestick forms at this level, it can signal that the pullback is ending and that the downtrend may resume.
This combination of trend direction, resistance level, and rejection of higher prices significantly increases the probability of the trade.
Trading the Shooting Star After a Liquidity Sweep
Another powerful setup occurs when the Shooting Star forms after a liquidity sweep near resistance.
Liquidity sweeps happen when the market briefly moves above a key level to trigger stop-loss orders before reversing direction.
Consider the following scenario.
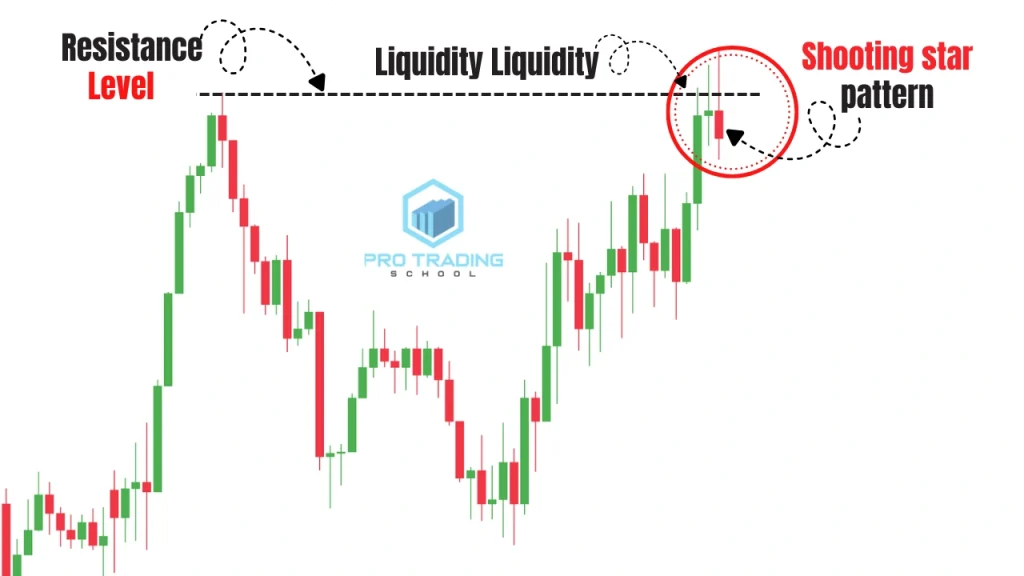
The market pushes upward and then reverses, creating a resistance level.
At this stage, many traders place their stop losses above the resistance level.
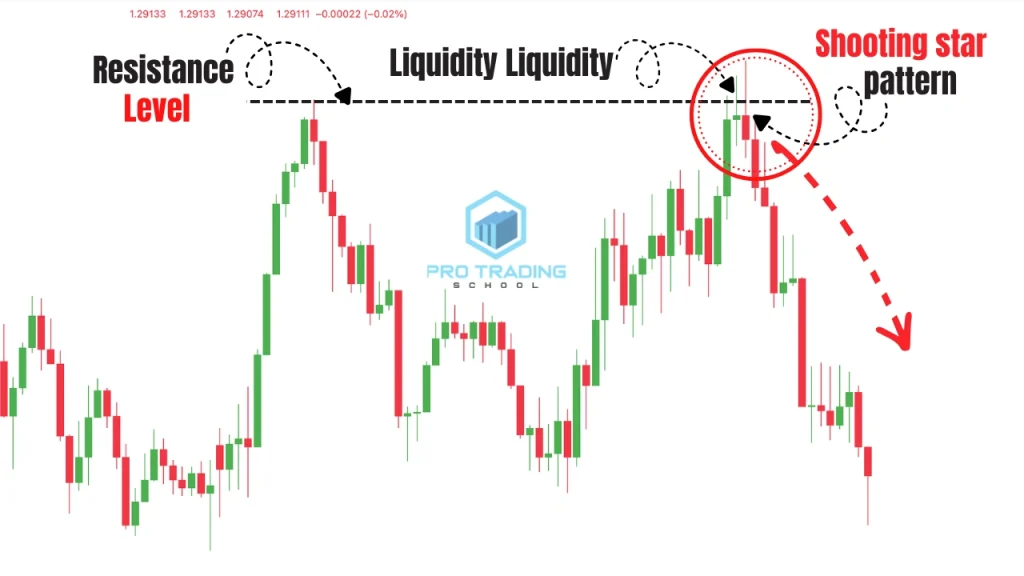
Eventually, the market moves above the resistance level, triggering those stop losses. However, instead of continuing higher, price quickly falls back below the level.
If this rejection forms a Shooting Star candlestick, it can signal that the breakout was false and that smart money has swept the liquidity above the resistance.
After this type of rejection, the market often moves strongly in the opposite direction.
Important Rule: Always Use Top-Down Analysis
Trading the Shooting Star pattern without considering the broader market context can lead to poor results.
Professional traders use top-down analysis to align their trades with the higher-timeframe market structure.
This means analyzing a higher timeframe before executing a trade on a lower timeframe.
Top-Down Analysis Rule
Use the following guideline when selecting your higher timeframe:
| Trading Timeframe | Higher Timeframe to Analyze | Purpose of Higher Timeframe |
| 1-Minute (M1) | 15-Minute (M15) | Ensure the higher timeframe trend aligns with your trade direction |
| 5-Minute (M5) | 1-Hour (H1) | Confirm that the higher timeframe structure supports the setup |
| 1-Hour (H1) | Daily (D1) | Verify that the daily trend aligns with your position |
| 4-Hour (H4) | Daily (D1) | Make sure the major trend supports your trade idea |
The higher timeframe helps you understand the overall market direction and key levels.
Example: Using Multi-Timeframe Analysis to Trade the Shooting Star Candlestick Pattern
Look at the NZD/USD hourly chart. As you can see, the market is clearly trending downward and respecting a well-defined bearish trendline.
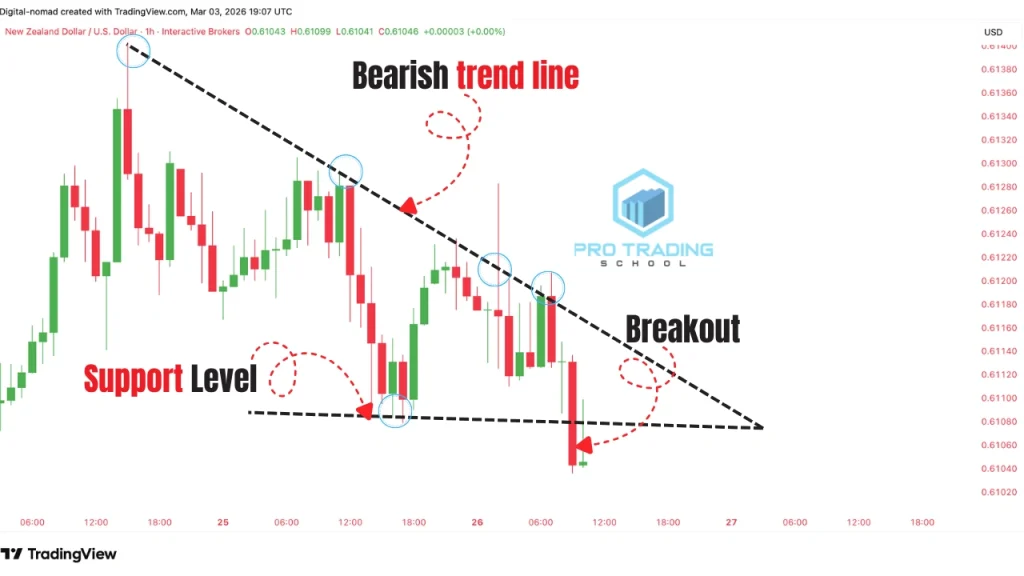
In addition, a previous support level has been broken, which further confirms the strength of the downtrend.
At the same time, the bearish trendline combined with the horizontal support level forms a descending triangle pattern.
A descending triangle is generally considered a bearish continuation pattern, especially when it forms during an existing downtrend.
This pattern reflects increasing selling pressure, as price continues to make lower highs while repeatedly testing the same support level.
Once the support level breaks, it signals that sellers have gained full control and that the downtrend is likely to continue.
This breakout from the descending triangle further confirms that the hourly timeframe remains bearish.
Since the higher timeframe shows a clear bearish bias, we can now switch to the 5-minute chart to look for a potential trade setup that aligns with this downward trend.
Now switch to the 5-minute chart.

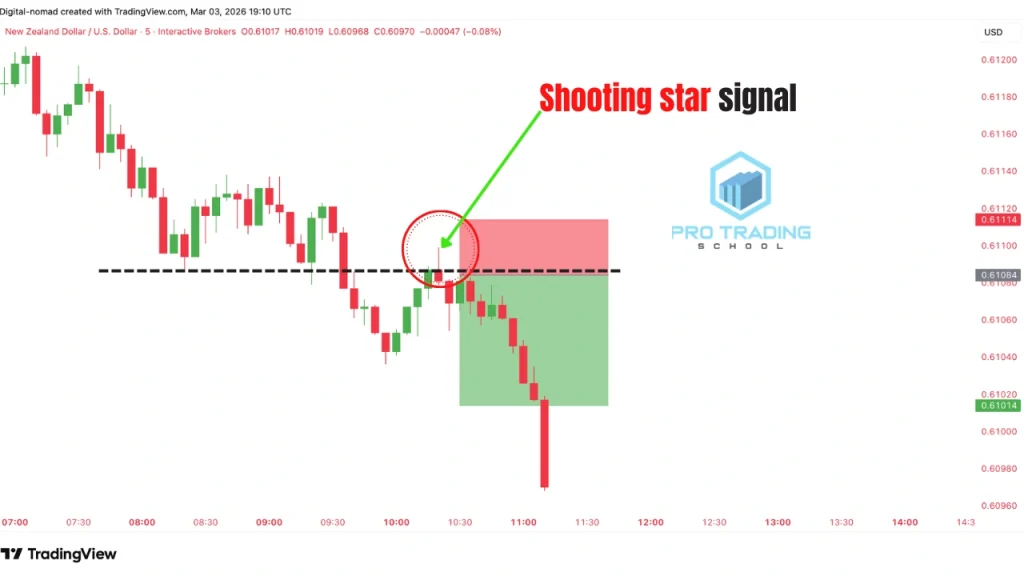
On the 5-minute timeframe, the pair is also clearly trending downward, forming consistent lower highs and lower lows. This confirms that sellers remain in control on the lower timeframe as well.
At this stage, the market breaks below a key support level and then pulls back to retest it. Once price reaches the broken level — now acting as resistance — it gets rejected and forms a clear Shooting Star candlestick pattern.
This rejection signals the potential end of the retracement phase and the beginning of a new impulsive move to the downside.
Since the lower timeframe setup aligns with the higher timeframe downtrend, this creates a high-probability trading opportunity.
How to Set Entry, Stop Loss, and Take Profit for the Shooting Star Pattern
Once the Shooting Star pattern forms in the correct market context, the trade can be executed with a clear plan.
A common approach is:

Entry
Enter the trade at the close of the Shooting Star candle.
Stop-Loss
Place the stop-loss above the high of the Shooting Star wick.
Target
The profit target can be set at the next support level or the next key price zone.
When the setup is aligned with the trend, resistance levels, and higher-timeframe analysis, the Shooting Star pattern can provide an effective entry for capturing the next downward move.
Key Rules for Trading the Shooting Star Candlestick Pattern
- Trade it with the trend whenever possible
- Look for the pattern after a pullback
- Focus on resistance levels
- Use top-down analysis
- Wait for confirmation before entering
Trading the Shooting Star Pattern With the Fibonacci Golden Zone
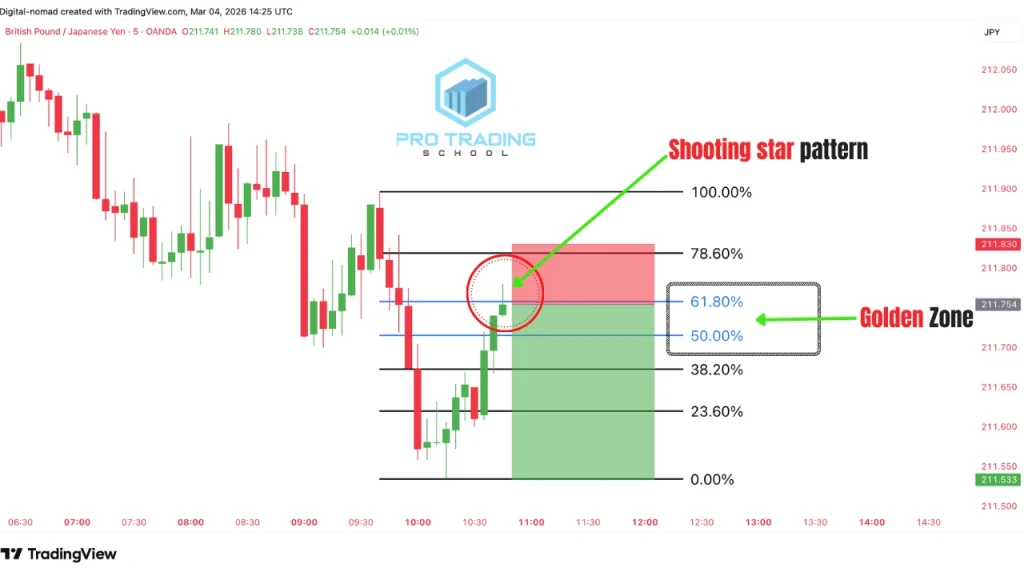
Another effective way to trade the Shooting Star candlestick pattern is by combining it with the Fibonacci retracement tool. This approach helps traders identify areas where a pullback may end and the main trend could resume.
As explained earlier, trending markets move in impulsive waves followed by retracements. Traders can use Fibonacci retracement levels to measure these pullbacks and identify potential reversal zones.
Identifying the Golden Retracement Area
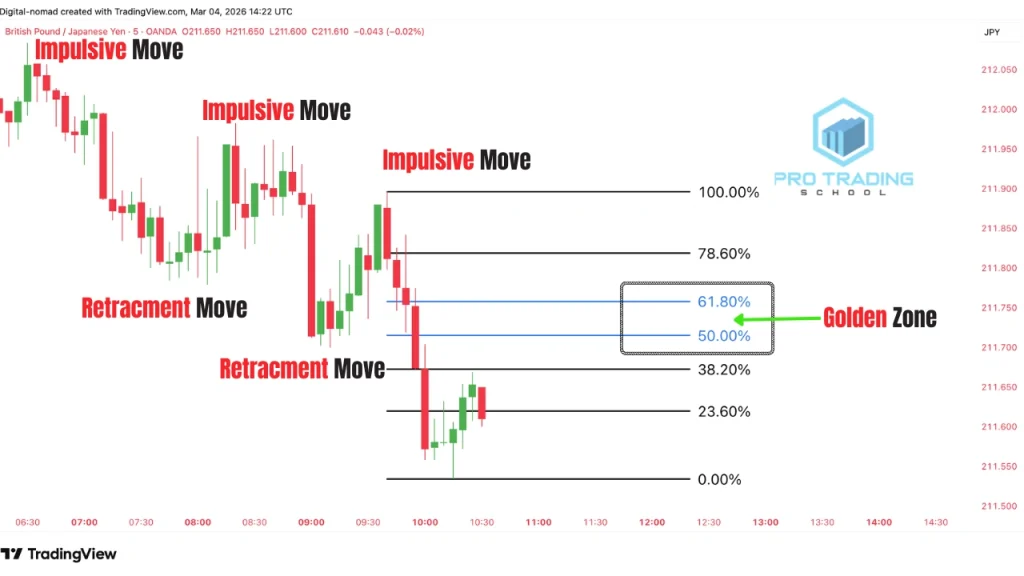
To find this area, apply the Fibonacci retracement tool to the previous impulsive move in the trend.
Two levels are particularly important:
- 50% Fibonacci retracement
- 61.8% Fibonacci retracement
These two levels create what traders commonly call the Golden Retracement Zone. In a downtrend, this zone often acts as resistance during a pullback.
Waiting for the Shooting Star Confirmation
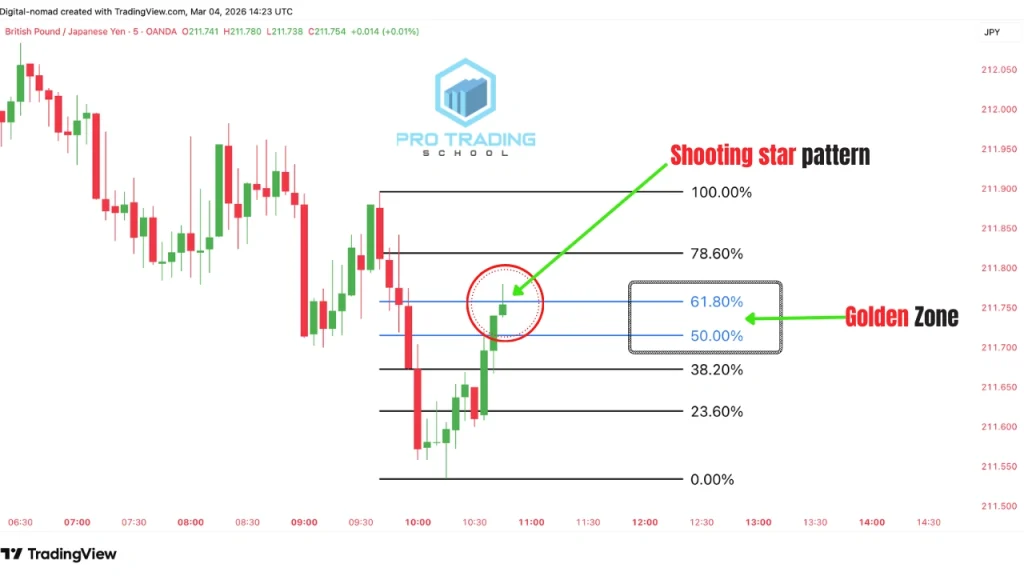
When price retraces into the 50%–61.8% Fibonacci zone, traders begin watching for signs that the retracement may be ending.
If a Shooting Star candlestick pattern forms inside this area, it indicates rejection of higher prices and suggests that sellers may be stepping back into the market.
In this situation, the Shooting Star can signal the end of the retracement and the beginning of a new impulsive move downward.
Confirming the Setup With Higher Timeframe Analysis
Before entering the trade, it is important to check the higher timeframe.
For example, if the Shooting Star setup appears on the 5-minute chart, traders should analyze the 1-hour chart to confirm the broader market context.
If the higher timeframe also shows bearish structure or resistance, the probability of the setup increases.
Trade Execution
Once the setup is confirmed, the trade can be executed using a simple plan.
Entry
Enter the trade at the close of the Shooting Star candle.
Stop-Loss
Place the stop-loss above the high of the Shooting Star wick.
Target
The profit target can be set at the next support level or another key price zone.

Important Note
This strategy can be applied across multiple timeframes, including:
- 5-minute charts
- 15-minute charts
- 1-hour charts
- Daily charts for swing trading
It can also be used across many financial markets such as forex, stocks, futures, cryptocurrencies, and commodities.
Trading the Shooting Star in a Range-Bound Market
Trading the Shooting Star candlestick pattern in a trending market can be very effective. However, markets spend a large portion of their time moving sideways rather than trending.
In fact, many analysts estimate that financial markets trend only about 25–30% of the time, while the remaining time they move in range-bound conditions.
If traders focus only on trending markets, they may miss many opportunities that occur while the market is ranging.
What Is a Range-Bound Market?

A range-bound market occurs when price moves horizontally between two clearly defined levels:
- Support
- Resistance
In this type of market structure, neither buyers nor sellers have full control. Buyers tend to push the price higher near the support level, while sellers push the price lower near the resistance level.
As a result, the market repeatedly moves back and forth between these two boundaries, creating a sideways price movement.
Trading the Shooting Star at Range Resistance
One of the best opportunities when trading a ranging market occurs when price approaches the upper boundary of the range, which acts as resistance.
When the market reaches this area, sellers often step in and push the price lower.
If a Shooting Star candlestick pattern forms near the resistance level, it can signal strong rejection of higher prices and provide a potential selling opportunity.
In this situation, the Shooting Star indicates that buyers attempted to break above resistance but failed, allowing sellers to regain control.
Example of a Shooting Star Setup in a Range
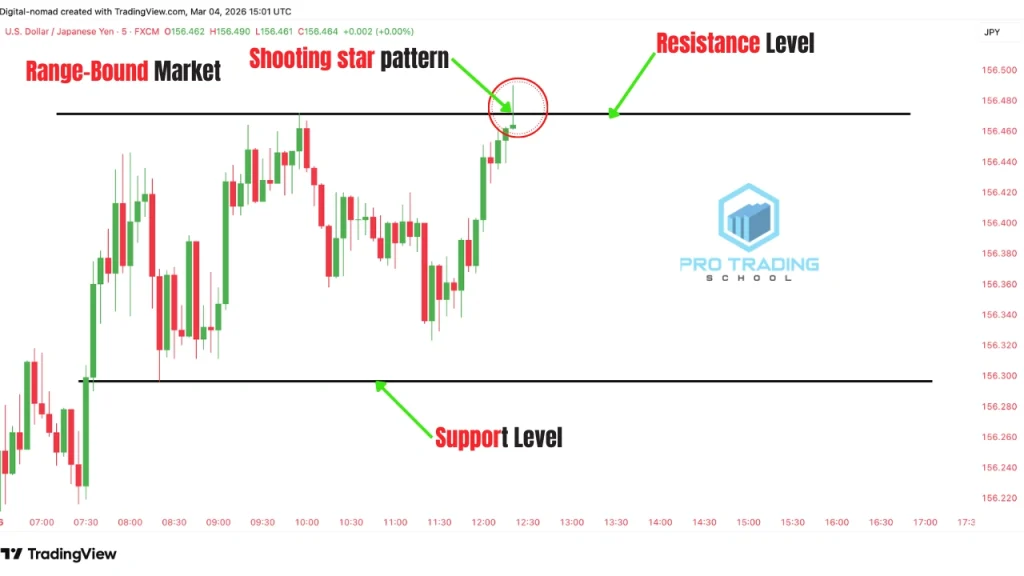
Imagine a market that is clearly moving sideways between support and resistance.
As price moves upward toward the resistance level, traders begin watching for signs of rejection.
Once the market reaches the resistance area, a Shooting Star candle forms, showing that the attempt to move higher was rejected.
This candle becomes the trade signal.
Trade Execution
Once the setup appears, the trade can be executed using a simple plan.
Entry
Enter the trade at the close of the Shooting Star candle.
Stop-Loss
Place the stop-loss above the high of the Shooting Star wick.
Target
Set the target near the next support level, which represents the lower boundary of the range.
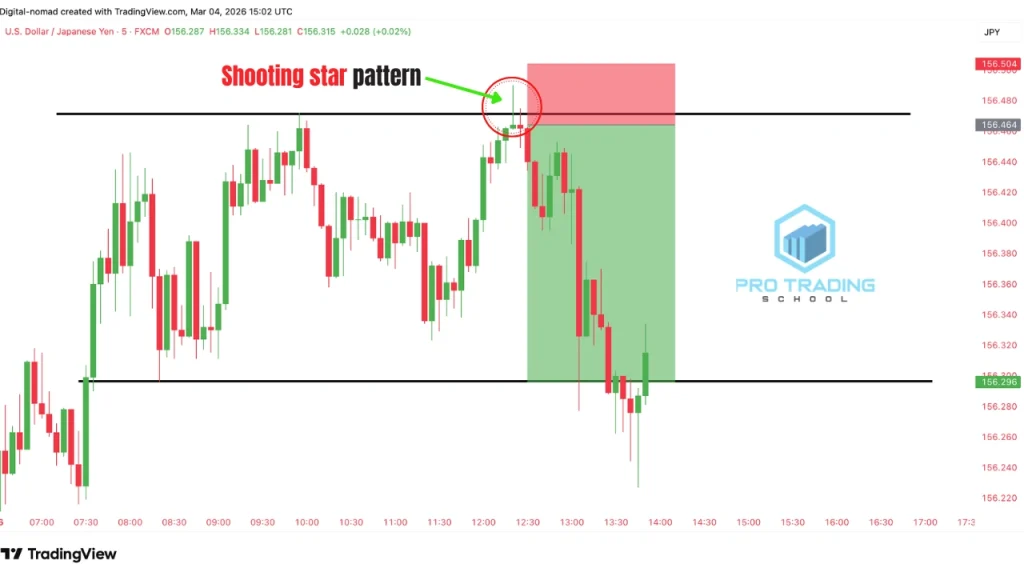
In many cases, the market moves from resistance back toward support, allowing traders to capture the move inside the range.
Important Reminder: Always Use Top-Down Analysis
Even when trading range setups, it is important to perform top-down analysis.
Always check the higher timeframe to make sure the trade aligns with the broader market structure. This helps avoid trading against stronger trends that may exist on higher timeframes.
Trading the Shooting Star After a Range Breakout
Another powerful setup occurs when the Shooting Star appears after the market exits a range.
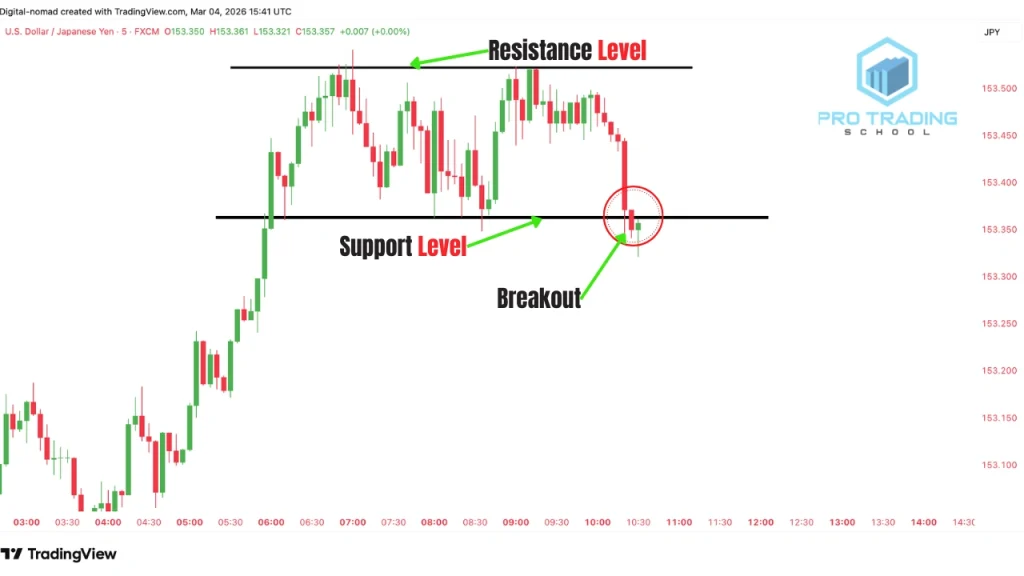
First, consider a market that has been moving sideways between support and resistance. During this phase, price repeatedly moves between the two levels without establishing a clear trend.
Eventually, the market breaks below the support level of the range.
This breakout suggests that sellers are gaining strength and that a new downward trend may begin.
The Retest of the Broken Level
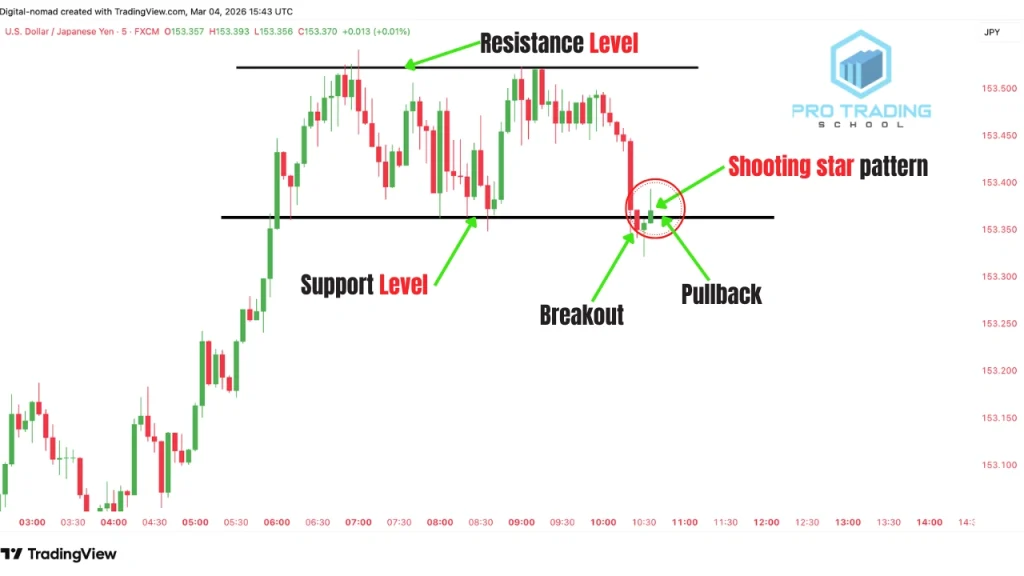
After breaking below the range, the market often retraces back toward the previous support level.
This level frequently turns into new resistance.
If price reaches this area and forms a Shooting Star candlestick pattern, it signals rejection of the retest and confirms that sellers are defending the level.
This becomes the trade setup.
Confirming the Setup With Higher Timeframe Analysis
Suppose the setup appears on the 5-minute chart.
Before entering the trade, traders should check the higher timeframe, such as the 1-hour chart, to understand the broader market context.
If the higher timeframe also shows a bearish trend or strong resistance, the probability of the trade increases.
Executing the Trade
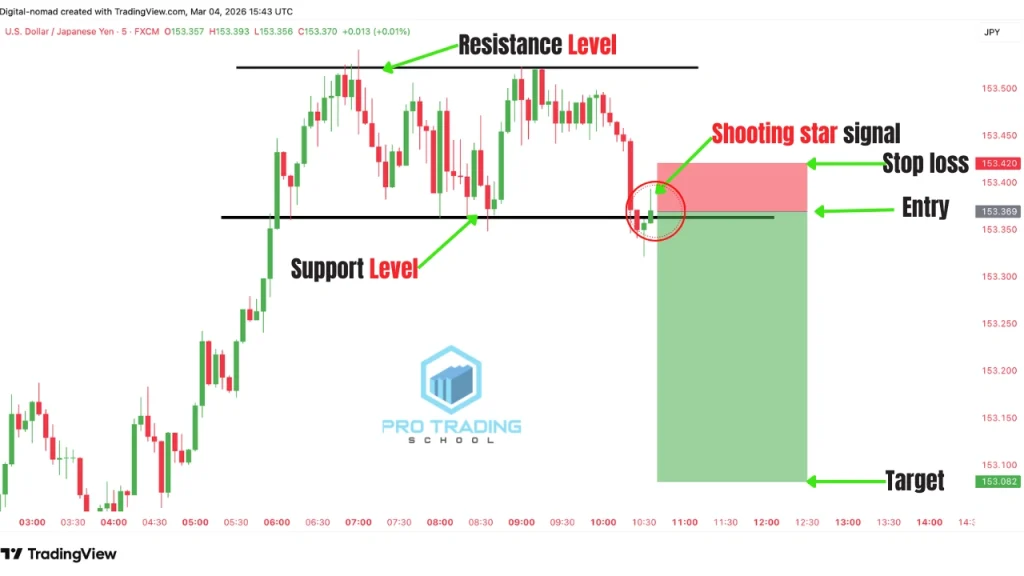
Once the setup is confirmed, the trade can be taken.
Entry
Enter the trade at the close of the Shooting Star candle.
Stop-Loss
Place the stop-loss above the high of the Shooting Star wick.
Target
The target can be set at the next support level or another key price zone.
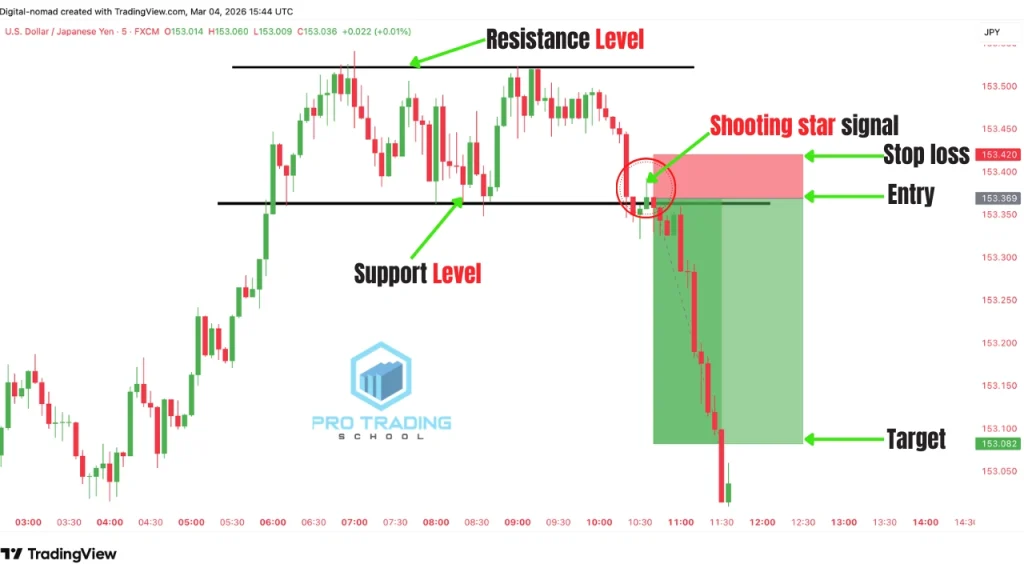
When the range breakout aligns with higher timeframe analysis and a clear Shooting Star rejection, the market often continues moving in the direction of the breakout.
Trading the Shooting Star at Supply Zones
One of the most powerful ways to trade the Shooting Star candlestick pattern is by combining it with supply zones.
This approach focuses on identifying areas where institutional traders previously entered the market and then waiting for price to return to those areas.
When the Shooting Star appears inside a strong supply zone, it can provide a high-probability confirmation that sellers are defending the level.
Identifying the Supply Zone
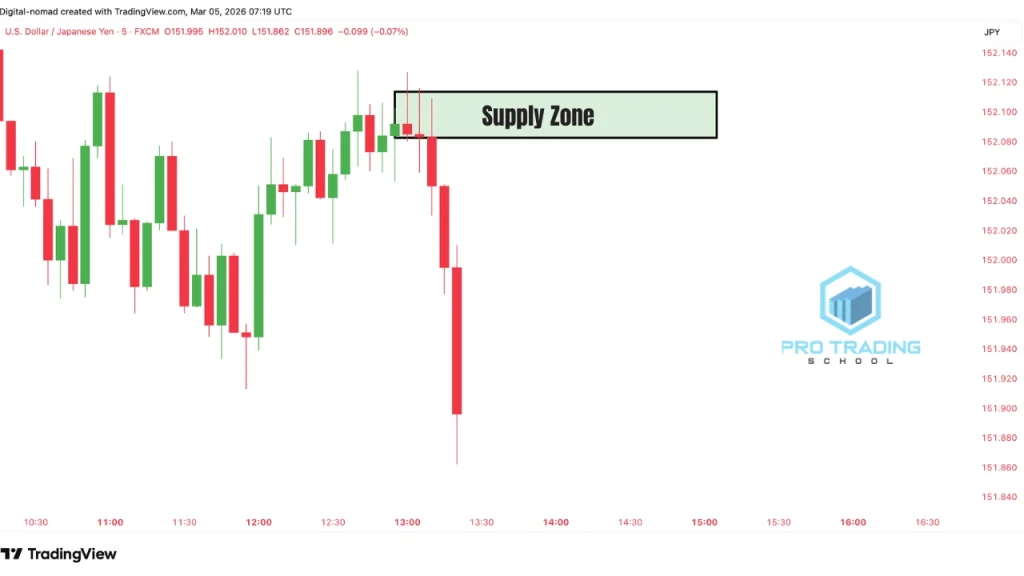
Supply zones often originate from strong impulsive moves downward.
When the market suddenly drops with large bearish candles, it usually indicates strong selling pressure from institutional participants rather than random price movement.
The area where this move begins is known as the base, and this is the zone traders use to draw the supply level.
Once the supply zone is identified on the chart, traders wait patiently for the market to retrace back to this area.
Waiting for the Retracement
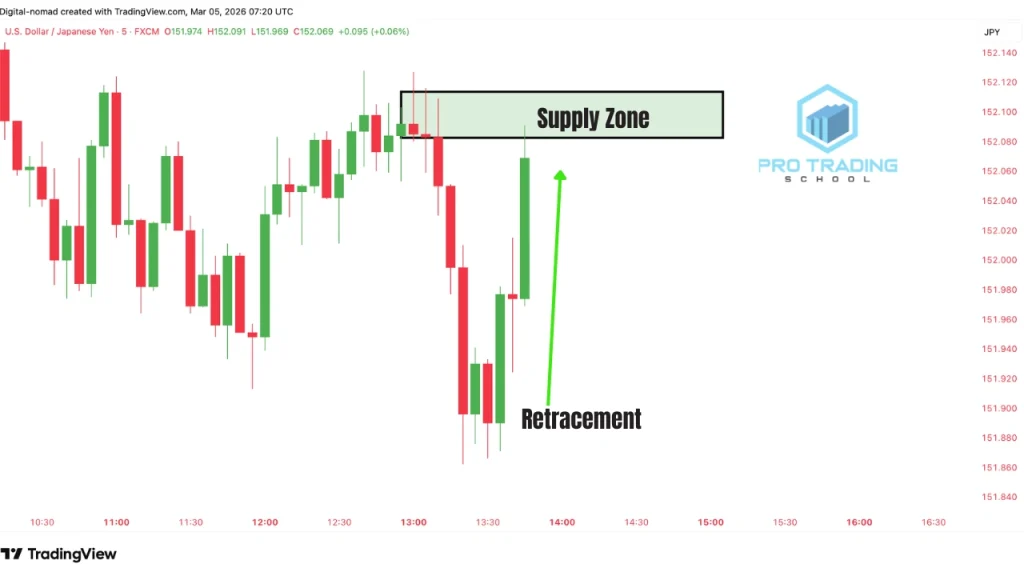
After a strong bearish move, the market often retraces part of the move before continuing in the original direction.
When price returns to the supply zone, traders begin looking for signs that sellers are stepping back into the market.
One of the strongest confirmation signals is the formation of a Shooting Star candlestick pattern.
Using the Shooting Star as Confirmation
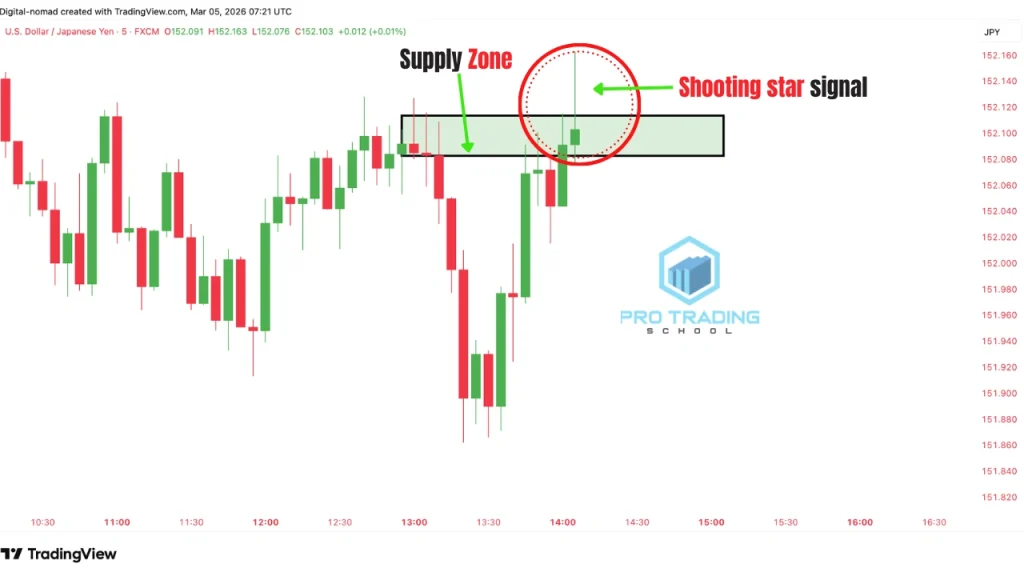
When the market reaches the supply zone and forms a Shooting Star candle, it indicates that buyers attempted to push the price higher but were rejected.
This rejection suggests that sellers are defending the zone.
In this context, the Shooting Star does not act as the main reason for the trade. Instead, it confirms that the supply zone is active and that a new downward move may begin.
Executing the Trade
Once the confirmation appears, the trade can be executed using a clear plan.
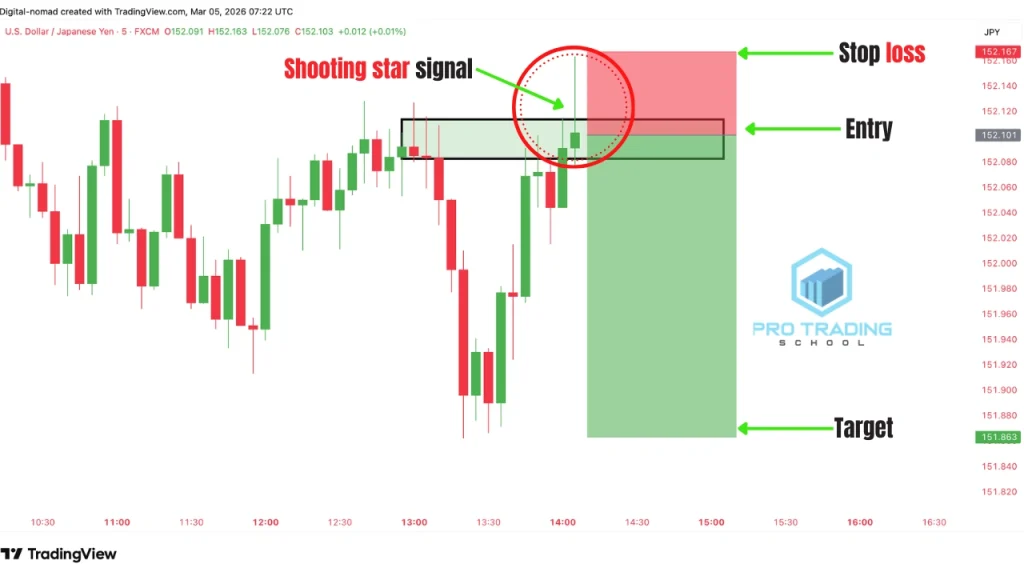
Entry
Enter the trade at the close of the Shooting Star candle.
Stop-Loss
Place the stop-loss above the high of the Shooting Star wick.
Target
The profit target can be set at the next support level or the next key price zone.
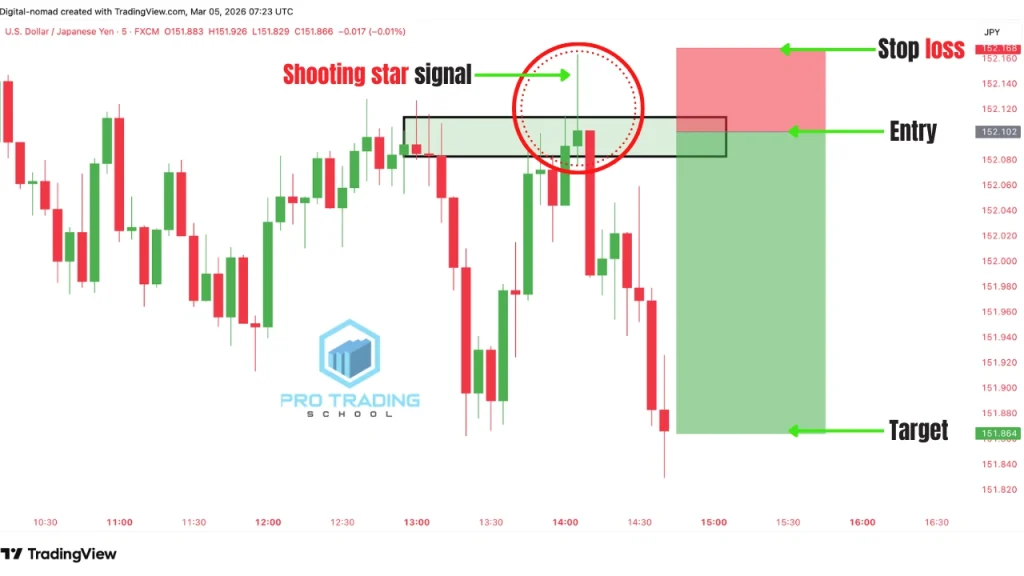
When the setup occurs at a strong supply zone, the market often resumes its downward movement.
Why This Strategy Is Considered Advanced
This strategy is not recommended for beginners because it requires the ability to properly identify and qualify supply zones.
Many traders assume that every strong move creates a valid supply zone. However, this is not always the case.
Consider the following example.
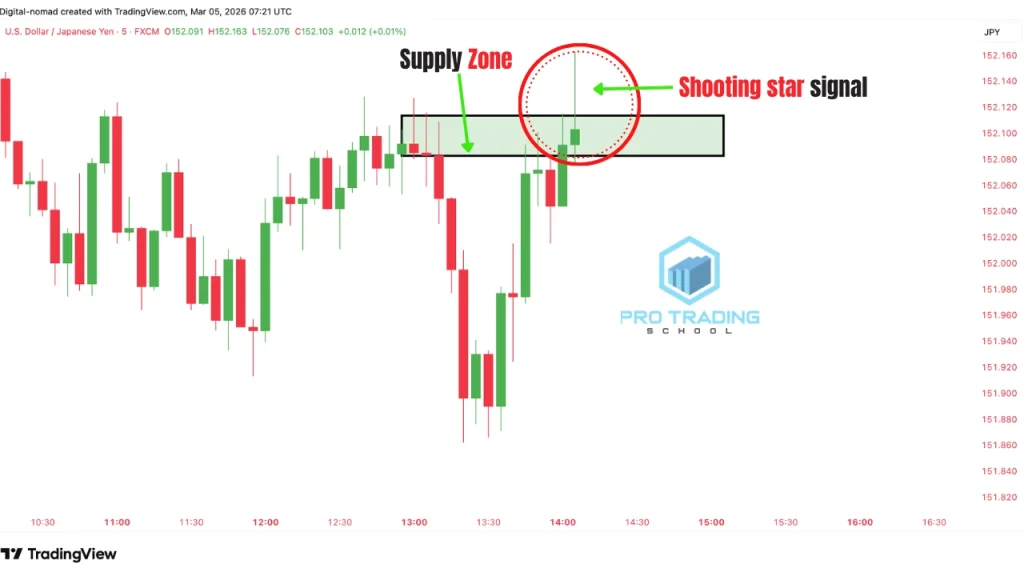
The market moves downward and a supply zone is drawn from the base of the move. Later, price retraces back to this zone and forms a Shooting Star candle.
A trader may enter the trade expecting the market to drop again.
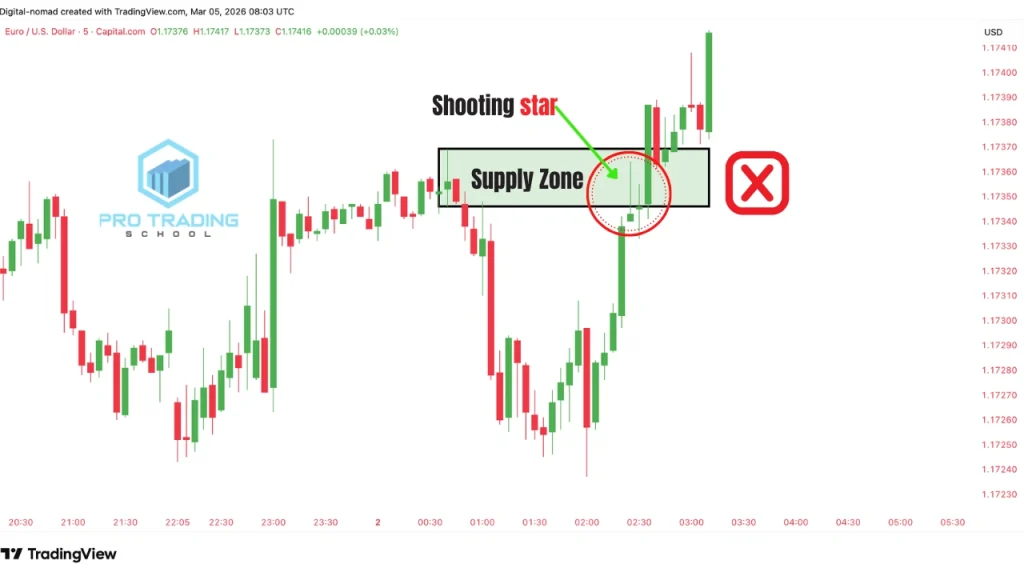
However, instead of falling, the market continues moving higher and the trade fails.
Why did this happen?
Because the supply zone itself was weak.
The Shooting Star pattern only provides a sell signal, but if the market context is incorrect or the zone is weak, the signal can fail.
This is why traders must first qualify the strength of the supply zone before using the Shooting Star as confirmation.
How to Qualify a Strong Supply Zone
Before taking a trade using this strategy, traders should evaluate whether the zone meets several important criteria.
A strong supply zone typically shows the following characteristics:
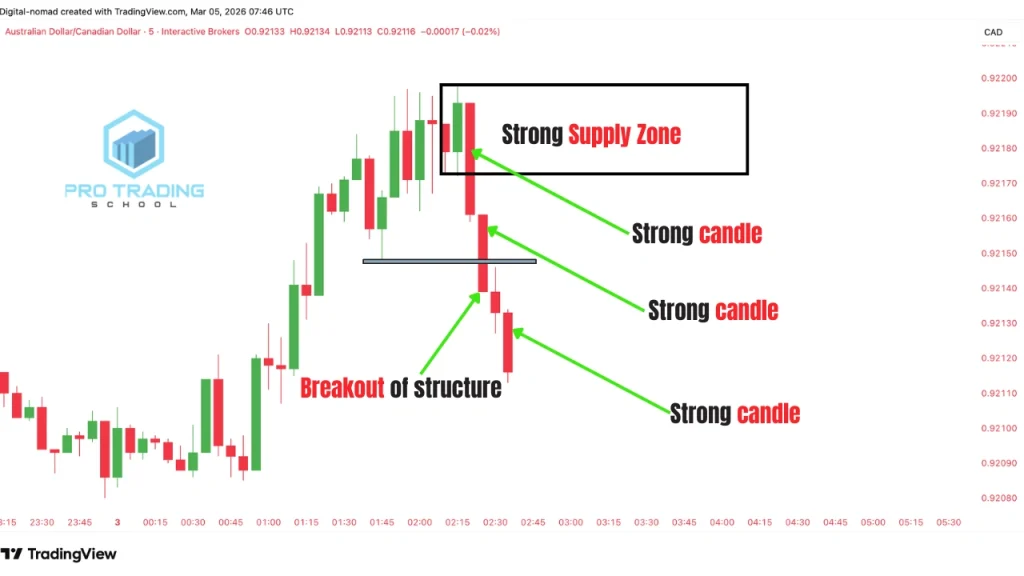
- A strong impulsive move away from the zone
- Large bearish candles leaving the base
- Little or no consolidation after the move
- The zone has not been tested multiple times
- The move removed previous support levels or liquidity
When these conditions are present, the supply zone is more likely to represent institutional selling pressure.
Combining the Zone With the Shooting Star
Once a strong supply zone is identified, traders wait for the market to retrace back to the zone.
If price reaches the zone and forms a Shooting Star candlestick pattern, it signals rejection of higher prices and confirms that sellers are defending the level.
This is where the trade setup appears.
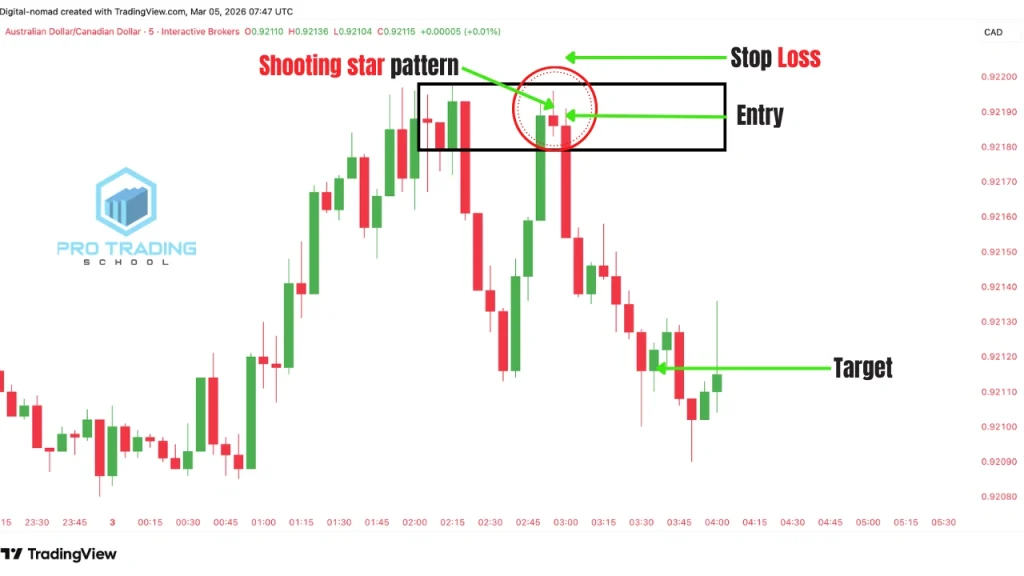
Entry
Enter at the close of the Shooting Star candle.
Stop-Loss
Place the stop-loss above the Shooting Star wick.
Target
The target can be placed at the next support level or the next demand area.
In this strategy, the supply zone is the primary reason for the trade, while the Shooting Star acts only as a confirmation signal.
When both elements align, the probability of the setup increases significantly.
The shooting star candlestick pattern is a powerful bearish reversal signal that appears after an uptrend and indicates that sellers are starting to take control of the market. If you want to learn another powerful bearish reversal setup, check out our complete guide on the hanging man candlestick pattern.
Mistakes to Avoid When Trading the Shooting Star Candlestick Pattern
The Shooting Star candlestick pattern can be a powerful entry signal, but only when it appears in the right context. Many traders lose money with this pattern not because the candle “doesn’t work,” but because they use it in the wrong way.
Below are the most common mistakes to avoid.
1) Trading the Shooting Star Pattern Alone
A Shooting Star is best treated as a confirmation signal, not a complete strategy by itself.
If you take every Shooting Star you see without checking the trend, key levels, or market structure, you will eventually get chopped up by random price fluctuations.
The candle can suggest rejection, but context is what makes the signal tradable.
2) Using the Shooting Star in the Wrong Market Location
The Shooting Star candlestick pattern should only be traded at key resistance levels, especially when the market is ranging.
In a range-bound market, price moves back and forth between two boundaries:
- Support
- Resistance
When price reaches the upper boundary of the range (resistance), sellers often step into the market and push the price lower.
If a Shooting Star candlestick pattern forms at this level, it can signal rejection of higher prices and provide a potential selling opportunity.
A common mistake is trading a Shooting Star that forms in the middle of the range.
Even if the candle looks perfect, it should be ignored if it does not appear near a meaningful resistance level. In the middle of a range, price action is often random and less reliable.
For this reason, the Shooting Star pattern becomes much more effective when it forms at resistance rather than inside the range.
3) Trading the Shooting Star Against the Trend
Another costly mistake is trying to “catch the top” by shorting a Shooting Star in a strong uptrend.
In a trending market, price typically alternates between:
- impulsive moves (trend direction)
- retracement moves (pullbacks)
When the market is trending upward, a Shooting Star can appear at the end of a retracement and still fail, because the dominant trend remains bullish.
Often, price drops slightly after the candle, then the move turns into a small pullback… and the market continues upward into another impulsive leg.
If you trade against the trend, you are betting on a reversal while momentum is still on the side of the trend.
4) Confusing the Shooting Star With Similar Candles
Not every candle with an upper wick is a Shooting Star.
A true Shooting Star typically has:
- a small real body near the bottom of the candle
- a long upper wick
- little to no lower wick (in many cases)
A common mistake is labeling a candle as a Shooting Star when the body is large and the candle does not show the classic “small body + long wick” structure.
If your strategy is specifically based on Shooting Stars, you should avoid forcing the pattern where it doesn’t exist.
5) Using a Stop-Loss That Is Too Tight
Many traders spot a perfect setup, enter at the close of the Shooting Star, and then place a stop-loss that is too close.
The problem is that price often “breathes” around key zones. It may fluctuate, spike, and briefly move against your entry before continuing in your direction.
If your stop-loss is too tight, the market can trigger it with a stop hunt (sometimes near liquidity) and then continue toward your target without you.
A Shooting Star entry is not enough—you must also give the trade enough room based on the structure and volatility of the market.
6) Ignoring Risk-to-Reward Ratio
Even if the setup looks perfect, the trade can still be a poor decision if the risk-to-reward is not worth it.
For example, you may find a Shooting Star at resistance, but when you plot your:
- entry
- stop-loss
- target
you realize the trade offers only 1:1 risk-to-reward.
A 1:1 trade might win sometimes, but it is usually not strong enough to build long-term profitability—especially after spreads, commissions, and losing streaks.
Before entering any Shooting Star trade, always check whether the setup offers a healthy risk-to-reward (many traders aim for 1:2 or better, depending on strategy).
7) Skipping Top-Down Analysis (The Most Important Mistake)
The biggest mistake is taking a Shooting Star signal on a lower timeframe without checking the higher timeframe context.
A setup can look perfect on the 5-minute chart, but if the higher timeframe shows strong bullish structure, you may be shorting directly into higher-timeframe buying pressure.
Top-down analysis helps you confirm whether:
- the market structure supports your idea
- the level is meaningful on higher timeframes
- your trade aligns with the dominant trend
If the higher timeframe contradicts your setup, the best decision is often simple: skip the trade.
Shooting Star vs Inverted Hammer
The Shooting Star and the Inverted Hammer look almost identical because they share the same candle structure: a small real body near the bottom of the candle and a long upper shadow. However, their location within the market trend is what gives them different meanings.
Shooting Star
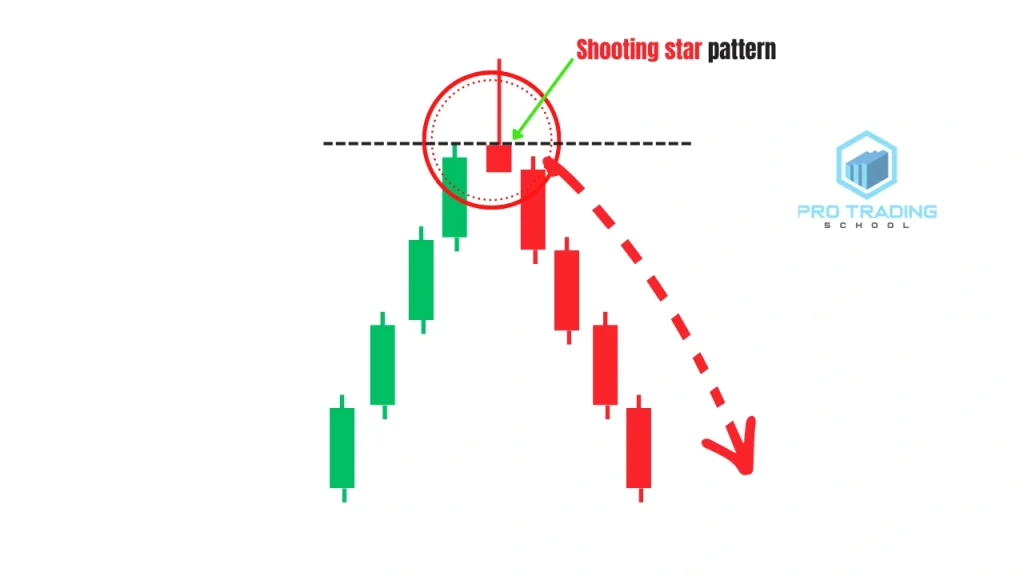
The Shooting Star candlestick pattern typically appears after an uptrend and signals that buyers may be losing control of the market.
During the formation of the candle, buyers push the price significantly higher. However, sellers step in aggressively and drive the price back down before the candle closes. This rejection of higher prices can indicate buyer exhaustion and the possibility of a bearish reversal.
The Shooting Star can also appear during a downtrend when price retraces toward a resistance level. In this context, the pattern acts as a continuation signal, confirming that the resistance level is holding and that the downward trend may resume.
Inverted Hammer
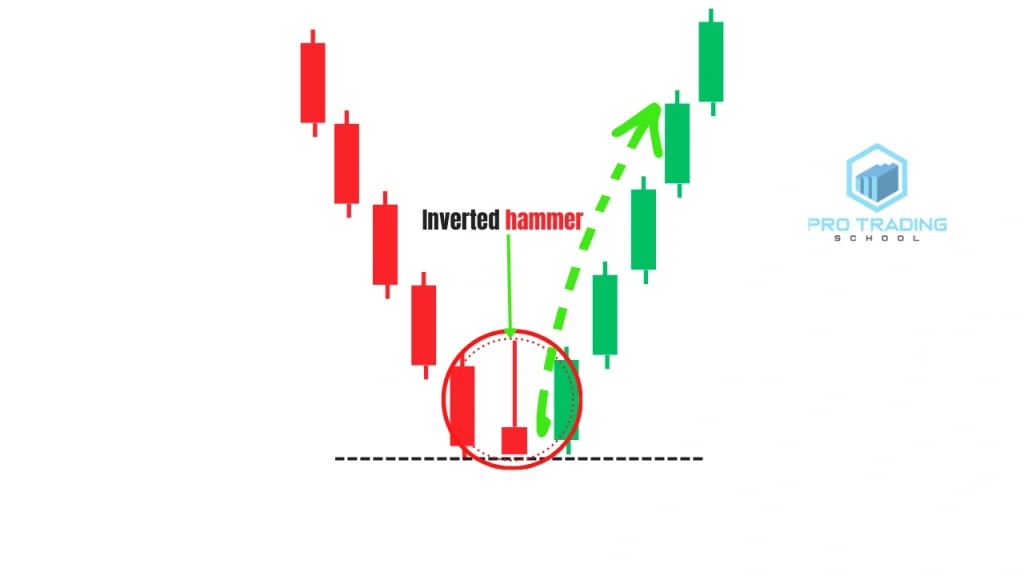
The Inverted Hammer has the same structure as the Shooting Star but appears after a downtrend.
When this candle forms near a support level, it may signal that selling pressure is weakening and that buyers are beginning to push the market upward. However, the pattern alone does not confirm a reversal.
For the signal to become stronger, traders usually wait for confirmation from the next candle. A common confirmation occurs when the next candle breaks above the high of the inverted hammer and closes above it, indicating that buyers are gaining control.
Learn the difference between the shooting star and the inverted hammer candlestick pattern in this detailed trading guide.
Key Difference
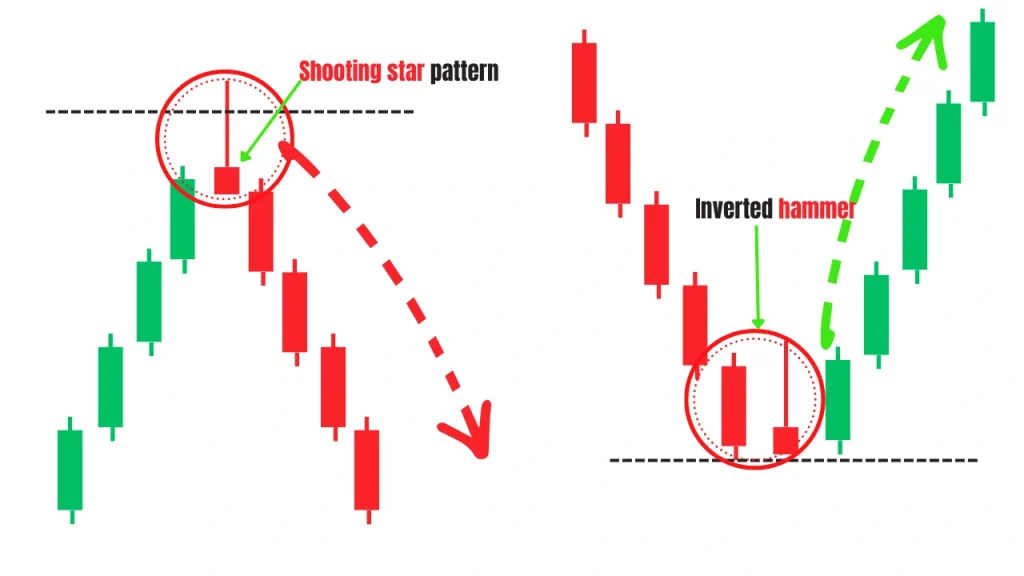
Although both candles share the same shape, their interpretation depends entirely on where they appear in the market structure.
- Shooting Star: Appears after an uptrend or at resistance and signals potential bearish pressure.
- Inverted Hammer: Appears after a downtrend near support and may signal a potential bullish reversal if confirmed.
Because context is critical, traders should always analyze trend direction, support and resistance levels, and higher-timeframe structure before acting on either pattern.
| Feature | Shooting Star | Inverted Hammer |
| Market Context | Appears after an uptrend | Appears after a downtrend |
| Signal Type | Bearish reversal signal | Potential bullish reversal signal |
| Candle Structure | Small real body near the bottom with a long upper shadow | Same structure: small real body near the bottom with a long upper shadow |
| Market Psychology | Buyers push price higher but sellers take control and reject the move | Sellers dominate early but buyers attempt to push the market higher |
| Meaning | Suggests buyer exhaustion and potential downward reversal | Suggests seller exhaustion and possible upward reversal |
| Confirmation Required | Usually confirmed by a bearish candle or break of support | Usually confirmed by a bullish candle or break of resistance |
| Trade Direction | Traders typically look for short (sell) opportunities | Traders look for long (buy) opportunities after confirmation |
| Reliability | More reliable when it forms at resistance, supply zones, or after liquidity sweeps | More reliable when it forms at support levels or demand zones |
| Role in Trading | Often used as a bearish confirmation signal in trading strategies | Often used as an early warning signal of potential bullish pressure |
Conclusion
The Shooting Star candlestick pattern is a powerful price action signal that can help traders identify potential bearish reversals or continuation opportunities in the market. However, the candle should never be traded in isolation.
For the pattern to be effective, it must appear in the right market context, such as near resistance levels, supply zones, Fibonacci retracement areas, or after a liquidity sweep.
When combined with these factors, the Shooting Star can provide a clear indication that buyers attempted to push the price higher but were rejected by sellers.
Traders should also remember that market structure and higher-timeframe analysis are essential. A Shooting Star that aligns with the broader trend and appears at a key level has a much higher probability of success than a candle that forms randomly on the chart.
Finally, risk management remains critical. Always use a proper stop-loss, a favorable risk-to-reward ratio, and confirmation from price action before entering a trade.
When used with the correct context, discipline, and confirmation, the Shooting Star candlestick pattern can become a valuable tool for spotting high-probability trading opportunities across different markets and timeframes.
Now that you’ve finished reading this guide on the Shooting Star candlestick pattern, feel free to check out our detailed Hammer Candlestick Pattern guide to learn how traders identify bullish reversal opportunities using the opposite version of this setup.
Frequently Asked Questions About the Shooting Star Candlestick Pattern
Is a shooting star candlestick bullish?
No. The shooting star candlestick pattern is typically considered a bearish reversal signal because it shows that buyers pushed the price higher but sellers rejected the move before the candle closed.
How do you trade a shooting star candlestick pattern?
Traders usually look for the shooting star to form near resistance levels, supply zones, or after a pullback in a downtrend. A common approach is to enter a short trade at the close of the candle, place the stop-loss above the wick, and target the next support level.
What is the difference between a shooting star and an inverted hammer?
Both patterns have the same candle structure, but they appear in different market contexts. A shooting star appears after an uptrend and signals potential bearish pressure, while an inverted hammer appears after a downtrend and may indicate potential bullish pressure.


1 thought on “Shooting Star Candlestick Pattern: How to Identify and Trade It (Complete Guide)”
Comments are closed.